Samples images
Adding images to your samples in Launchmetrics is crucial for enhancing your content's visual appeal and overall effectiveness. Images provide a dynamic and engaging element, allowing your audience to understand better the aesthetic and features of the products or samples you're showcasing. This is very useful when you're searching for a specific sample or when sending samples to an external recipient, helping them to understand what to expect in the delivery thanks to the images in the delivery memo.
There are 4 ways to update your samples images manually:
- Drag and drop in Samples Manager
- Upload images in Samples Details
- Bulk update with import for updates
- Add images with the Samples mobile application
Please note the File types supported for Samples Image are:
GIF, JPG, JPEG, PNG, SWF, PSD, BMP, TIF, TIFF, JPC, JP2, JPX, JB2, SWC, IFF, WBMP, XBM, PDF, WEBP, HEIC
API & FTP
Please note that sample images can also be added or updated via FTP or API.
Bulk Upload Images
To bulk upload images of multiple samples via excel
- Match samples with their image names
- Import the images in Launchmetrics
To match the samples with their images,
- From Samples Manager, click on the “import” tab and select “Import Samples”
- Download the blank excel template named “Samples”
- In the Excel file, enter all of the Sample data you need such as Designer, Collection, Season etc and then enter the image file name for each sample, with the file extension included (i.e .jpg vs .jpeg)
- You can find the full list of supported file types at the top of this article.
- Do not insert any actual image in your Excel Sheet
- You can find the full list of supported file types at the top of this article.

- Go to Import > Import Samples
- Upload the Samples Excel file
You have now associated Samples with their image name.
Now you need to upload the samples images in Launchmetrics.
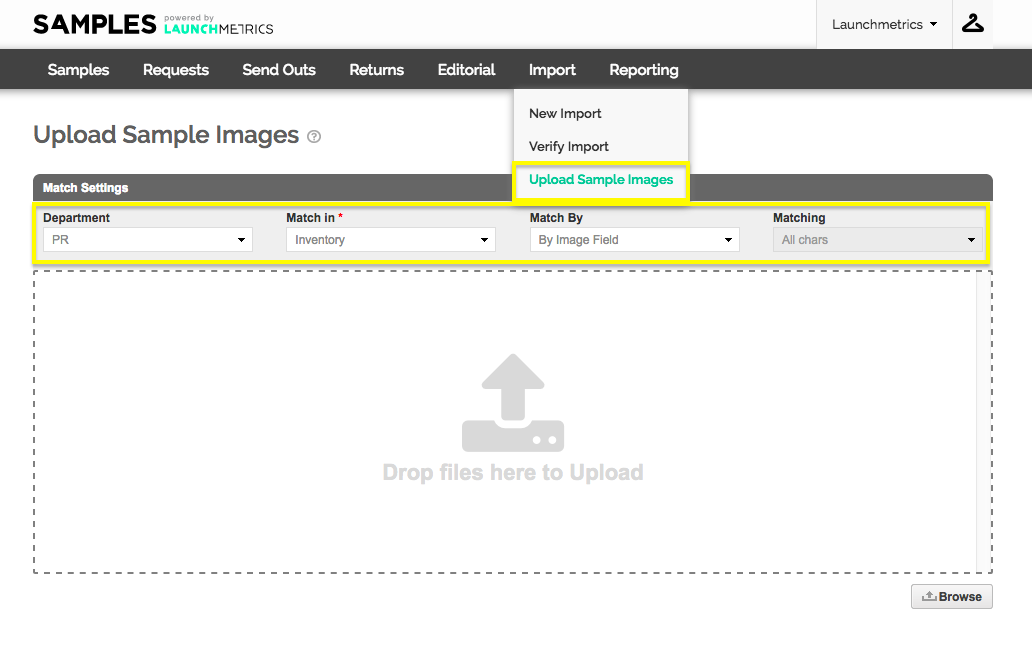
- Go to Import > Upload Samples Images
- Enter your department if applicable
-
Select from the “Matched in” drop-down the type of samples you would like to upload images for.
- “Inventory” will let you upload images for your already existing inventory (already verified)
- "Imported” will let you upload images for samples you have imported but not yet verified
-
Select from the “Match By” drop-down the pattern you would like to use to search your images. You can choose from the following patterns:
- By Image Field: Select this matching option if you have entered the exact image file names (e.g. sample.jpg) into the “Images” field of the Samples Excel template.
- By Style Number: Select this matching option if you have saved the image files as their corresponding samples’ style numbers.
- By Style Number and Color: Select this matching option if you have saved the image as a combination of the style number and the color associated with the sample.
-
Drag-and-drop the images you would like to upload

All uploaded images will appear at the bottom of the page in the “Upload Results” section. This section will list all images that have been matched successfully and unsuccessfully.
Click “View Details” to see a more in-depth analysis of this upload.

Up to 3 images will be displayed in Samples Manager but you can add as many images as you want. Click on More to see all images.
Drag-and-drop in Samples Manager
To easily add images to your samples, you can drag and drop images for each sample you want to update directly in Samples Manager. This can be done for your Inventory or Master List Samples.
- Make sure you have the Sample Images or Master list Images column available in your layout preferences
- Only these columns are available for images drag-and-drop
- Simply drag-and-drop images in-line on the column
- If there is no image available for your sample, the drag-and-drop placeholder will appear on hover
- If you already have images for your samples, the drag-and-drop placeholder will appear once you start dragging images
- Up to 3 images will be displayed
- You can click on more to see all sample images
- The first 3 dropped images of your last drag-and-drop will be displayed
- Images added to Sample Images will be reflected in other sample image columns
- Sample Image: the first dropped image of your last drag-and-drop will show in the column
- All Images: all newly dropped images will be accessible here
- Image: the first dropped image of your last drag-and-drop will show in the column
- Images added to Master List Images will be reflected in other master list image columns
- Master List Image: the first dropped image of your last drag-and-drop will show in the column
Keep in mind
- If an error occurs during the drag-and-drop, the image will be framed in red and you can hover it to understand the issue
- All uploads performed via drag-and-drop in Samples Manager will be added at the beginning of the list (rather than the end).
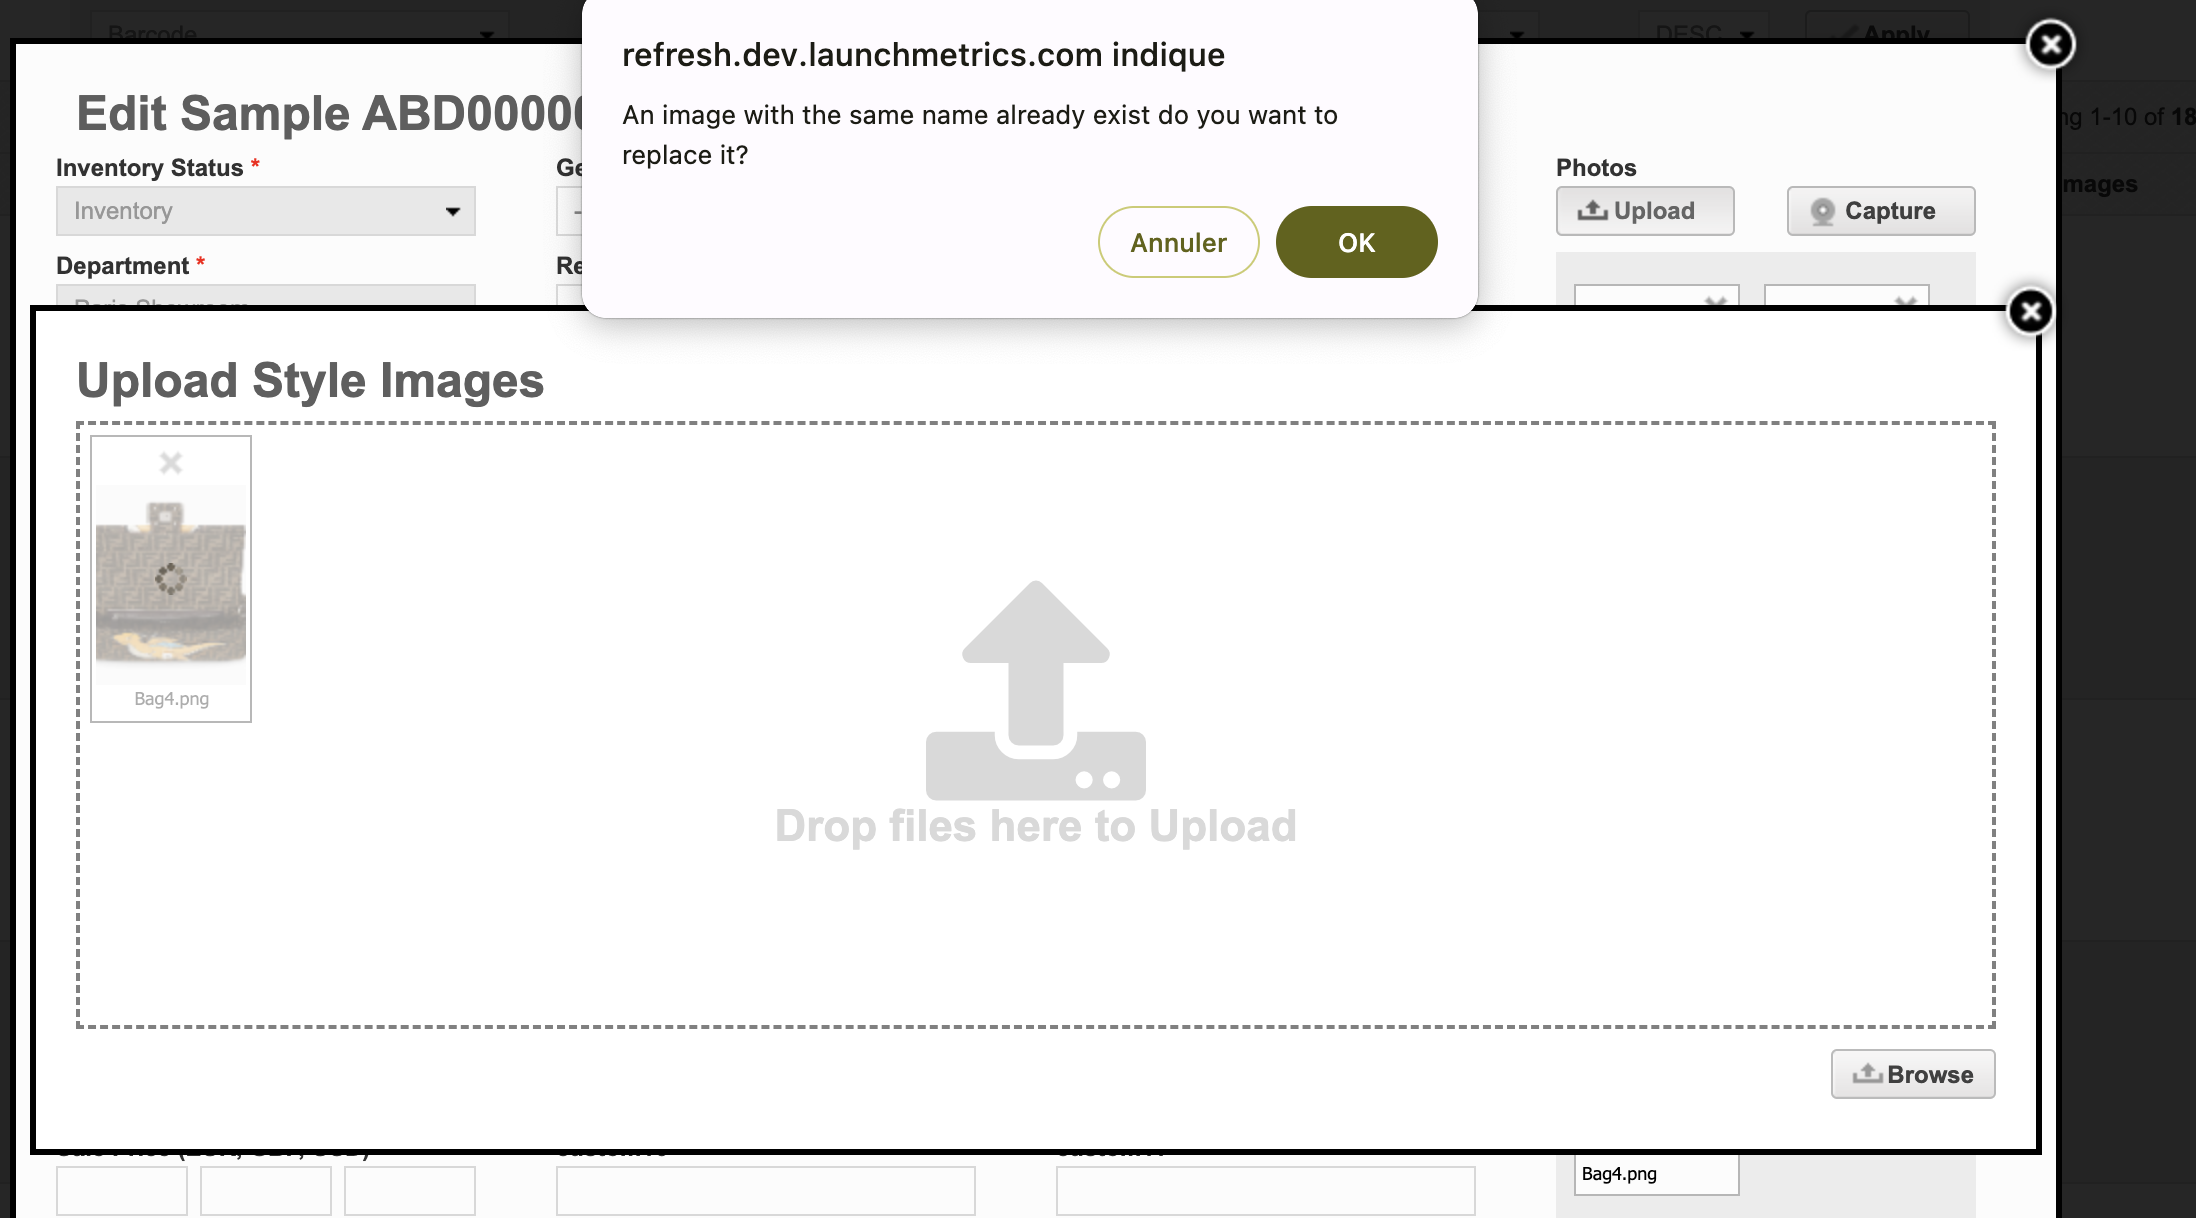
- You can not drop images with the same name as existing images already linked to a Sample. To update the image, first delete the old one.
- If you have defined a specific image order on the Samples details, drag-and-dropping images in Samples Manager will override it. But you can simply go to Samples Details and redefine your image order once you are done with drag-and-dropping images.
Upload images in Samples Details
Uploading images in Samples details is available for Inventory and Master List samples.
- Select an inventory or master list sample from Samples Manager
- Click on Edit details in the option dropdown menu
- In the Photo section, choose Upload or Capture to add or update your Samples images
- Up to 3 images will be displayed in Samples Manager but you can add as many images as you want
- You can click on more to see all sample images
- You can easily reorder your images to select which one to display first
- If you're uploading an image with the same name as an existing one, it will update the existing image with the new one

Bulk update with import for update
To bulk update images of multiple samples via the export/import for update, you need to proceed in 2 steps:
- Match samples with their image names
- Import the images in Launchmetrics
To match the samples with their images,
- From Samples Manager, click on Export for update and open the template file downloaded
- In the Excel file, enter the image file name for each sample, with the file extension included (i.e .jpg vs .jpeg)
- You can find the full list of supported file types at the top of this article.
- Do not insert any actual image in your Excel Sheet
- You can find the full list of supported file types at the top of this article.

- Go to Import > Import Samples
- Upload the Samples Excel file
You have associated Samples with their image name.
Now you need to upload the samples images in Launchmetrics.
- Go to Import > Upload Samples Images
- Enter your department if applicable
-
Select from the “Matched in” drop-down the type of samples you would like to upload images for.
- “Inventory” will let you upload images for your already existing inventory (already verified)
- "Imported” will let you upload images for samples you have imported but not yet verified
-
Select from the “Match By” drop-down the pattern you would like to use to search your images. You can choose from the following patterns:
- By Image Field: Select this matching option if you have entered the exact image file names (e.g. sample.jpg) into the “Images” field of the Samples Excel template.
- By Style Number: Select this matching option if you have saved the image files as their corresponding samples’ style numbers.
- By Style Number and Color: Select this matching option if you have saved the image as a combination of the style number and the color associated with the sample.
- Drag-and-drop the images you would like to upload

All uploaded images will appear at the bottom of the page in the “Upload Results” section. This section will list all images that have been matched successfully and unsuccessfully.
Click “View Details” to see a more in-depth analysis of this upload.

Up to 3 images will be displayed in Samples Manager but you can add as many images as you want. Click on More to see all images.
Add images with the Samples mobile application
From your Samples Mobile application, you can easily add images to your Samples.
- Scan or manually select samples
- Go to View Queue
- Swipe left to open the options
- And select Add photos, and choose from your library or files, or even take directly a picture of the sample in front of you